Welcome to Net Circle, where your business gets the visibility it deserves. Whether you’re a startup or an established company, listing your business on Net Circle is the easiest way to connect with a global audience, boost your online presence, and start attracting your ideal customers—fast.
Let’s walk you through how to list your business step by step.
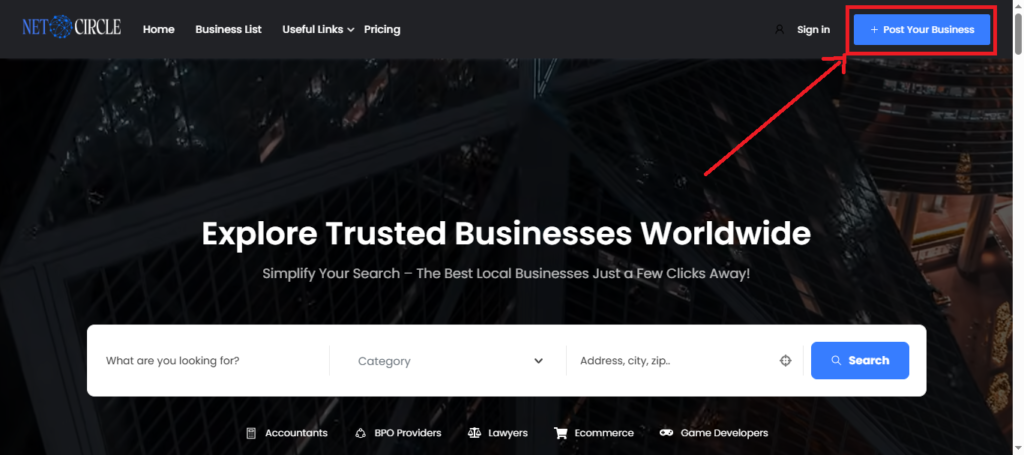
Step 1: Visit the “Post Your Business” Page
To begin, go to the Post Your Business page on the Net Circle website. This is where your listing journey starts.
This section allows you to register your business, choose a pricing plan, and enter all the necessary details to make your profile live. It’s designed to be simple, fast, and effective.
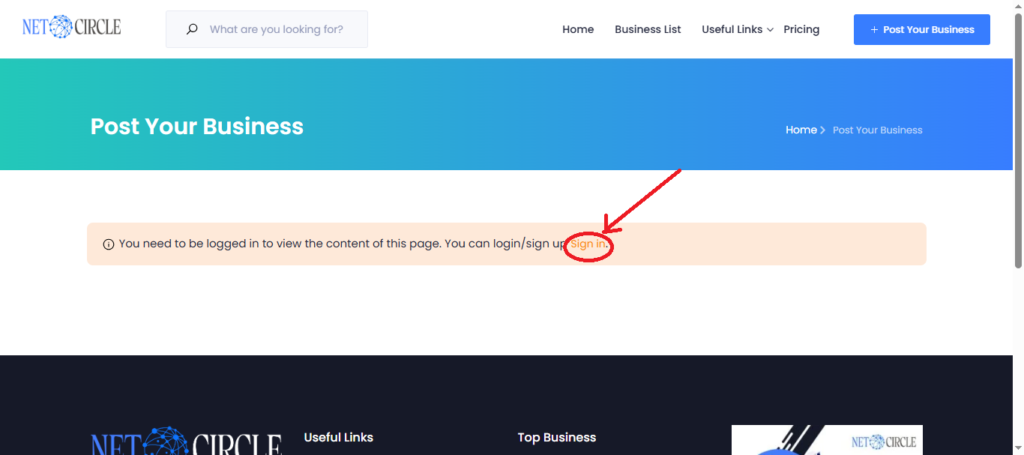
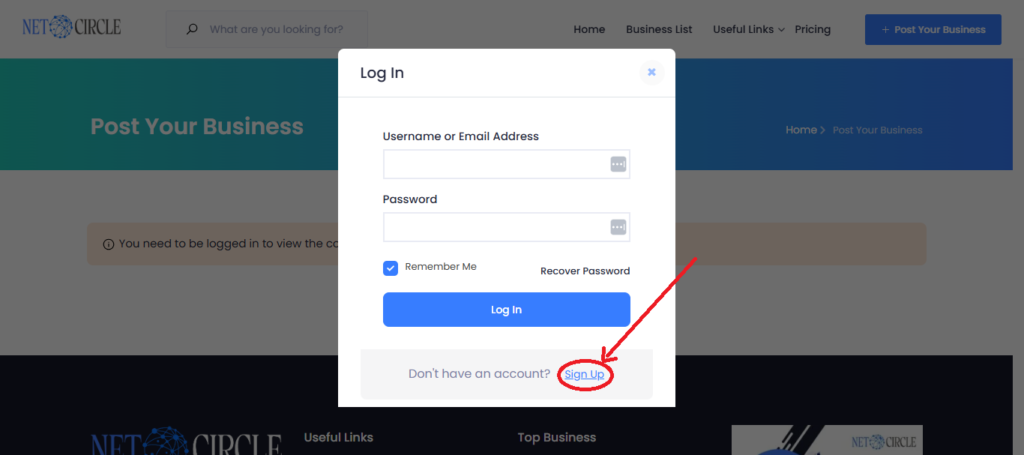
Step 2: Sign Up for a Net Circle Account
Before you can list your business, you need to create an account. This ensures your profile is secured and easy to manage later.
To sign up:
Enter your username and email address
Create a secure password
Provide your website URL
Write a short bio about yourself or your company
Check the boxes for Privacy Policy and Terms & Conditions after reading them
Finally, click the Sign Up button
Pro Tip: Your bio is your first impression. Keep it personal, professional, and purpose-driven.
Once registered, you’re ready to move forward.
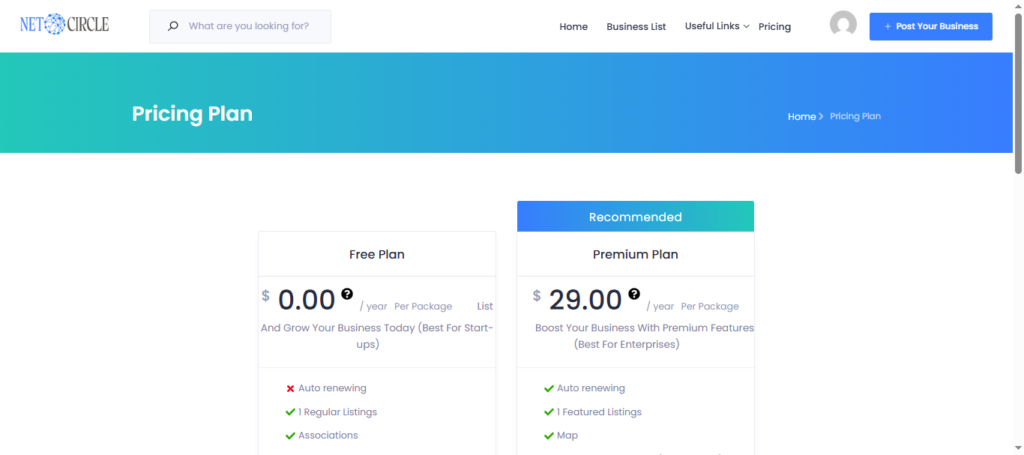
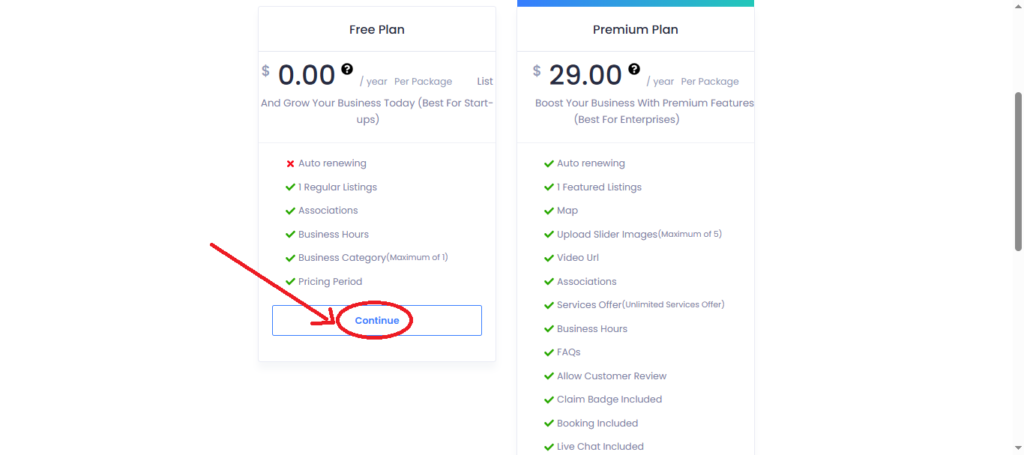
Step 3: Choose Your Pricing Plan
Net Circle offers two flexible listing packages to suit businesses of all sizes.
Free Plan – $0.00/year
Best For: Ideal for small businesses and startups testing the waters. Includes:
1 Regular Listing
Add Associations
Display Business Hours
Select 1 Business Category
Set Pricing Period
No Auto-Renewal
Premium Plan – $29.00/year
Best For: Perfect for established businesses ready to scale. Includes:
1 Featured Listing
Display Location on Map
Upload up to 5 Slider Images
Add a YouTube/Vimeo Video URL
Unlimited Services Offered
Add Business Hours and FAQs
Enable Customer Reviews
Include Claim Badge
Booking Feature
Live Chat Feature
Auto-Renewing Plan
For this guide, we’ll proceed with the Free Plan. Select your plan and click Continue to move on.
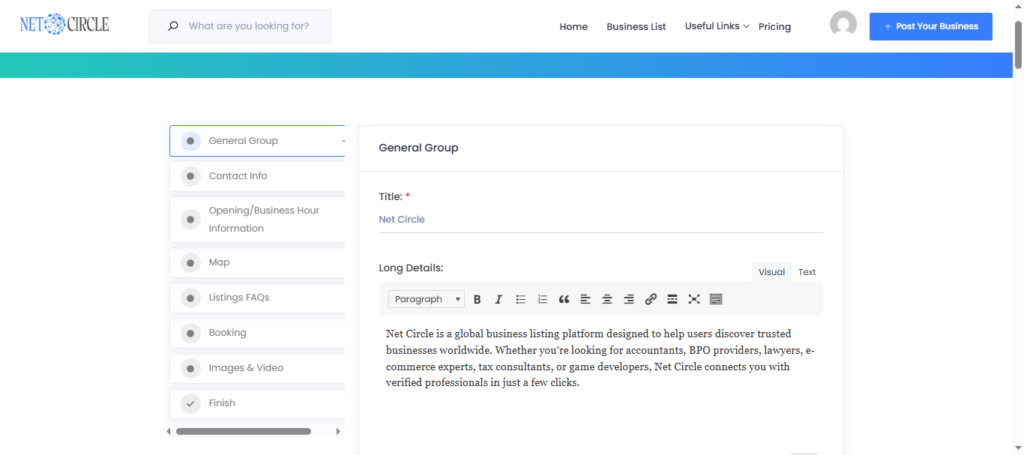
Step 4: Fill Out General Business Information
Now, it’s time to add the main details of your business. This is the section that visitors will see first, so make it appealing and informative.
What You’ll Need to Enter:
Title: A clear, catchy name for your business
Long Details: Describe what your business does, your services, and what makes you stand out (up to 500 characters)
Pricing Period & Pricing: Indicate if your pricing is hourly or fixed, and enter the rate
Associations: List any professional groups, organizations, or certifications your business is affiliated with. Showcase any credibility boosters
Business Category: Choose the most relevant option (e.g., Accountants, BPO Providers, Lawyers, Ecommerce, Game Developers, etc.) Or add a new category
Location: Select your business location (UK, US, India, Japan, etc.) Or add a new one
Tags: Add searchable keywords like “seo product listing”, “lawyers”, or “game developers”
Services Offered: Highlight your key offerings to attract relevant clients
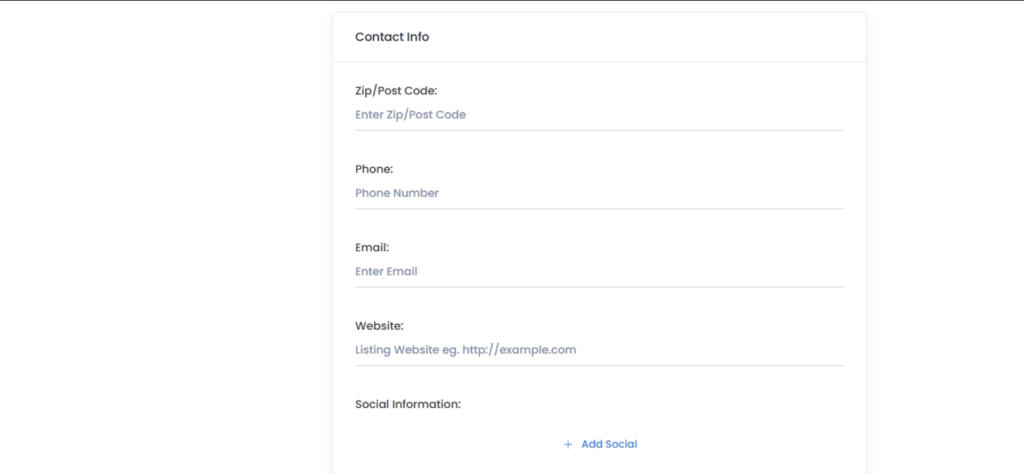
Step 5: Add Contact Information
Your contact info makes it easy for customers to reach you. Make sure it’s accurate and up to date. Give your customers every way possible to reach you.
Provide the Following:
Zip or Post Code
Phone Number
Email Address
Website URL
Social Media Links (Facebook, LinkedIn, Instagram, etc.)
Adding your online presence boosts credibility and helps customers connect with you on different platforms.
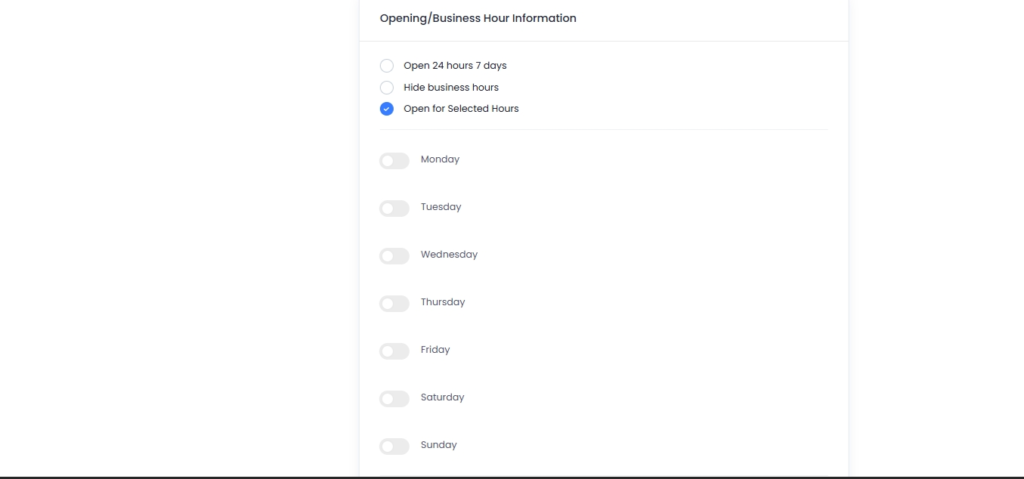
Step 6: Set Your Business Hours
Let your audience know when you’re open for business.
Enter your opening and closing times for each day of the week
This not only helps customers plan visits or calls, but it also adds to your listing’s credibility.
Step 7: Pinpoint Your Location on the Map
To make your business easier to find, add your physical address and location on the map.
Enter your full business address
Use the map tool to pinpoint your exact location
This is especially useful for businesses offering in-person services, deliveries, or physical store visits.
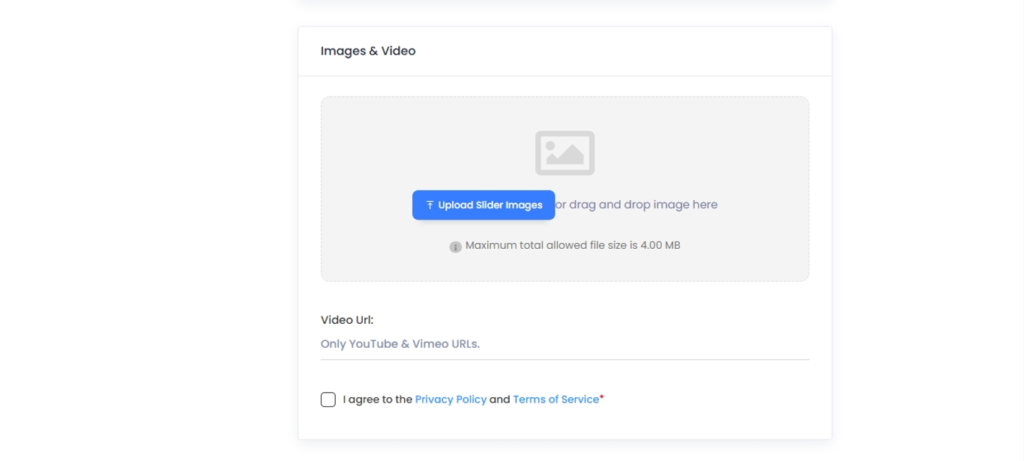
Step 8: Upload Images & Videos
Visuals speak louder than words. They build trust and make your listing stand out.
What you can upload:
High-quality Slider Images (up to 5 images, 4.00 MB max total size)
Video URL (YouTube or Vimeo only)
🎯 Tip: Use well-lit, high-resolution images. If you’re using video, keep it under 2 minutes and make sure it speaks directly to your ideal client.
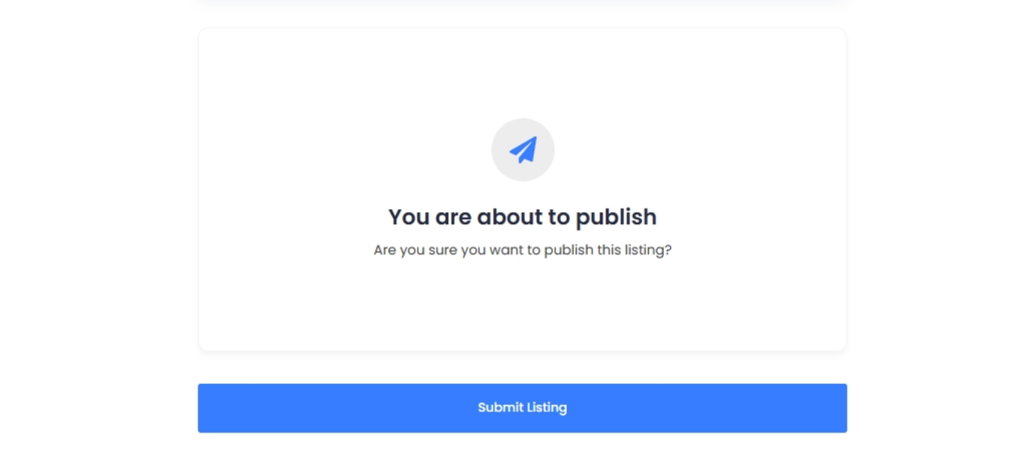
Step 9: Final Review & Publish Your Listing
You’re almost there! Before going live:
Review all the information you’ve entered
Ensure accuracy and professionalism
When everything looks perfect, click the “Publish” button
Confirm your submission by selecting “Yes”
Your listing will now be visible to thousands of potential clients on Net Circle!
Your Business Is Now Live on Net Circle!
Congratulations! You’ve successfully submitted your business. After a careful review, your business will be live. Your profile is now part of a trusted global network where customers search daily for verified services.
With Net Circle, you get:
Global Reach
Verified Listings
Powerful Tools to Grow Your Brand
Don’t wait! Go to the Post Your Business page on Net Circle today and let the world discover what your business has to offer.


Leave a Reply